Widen Shoes in the Freezer
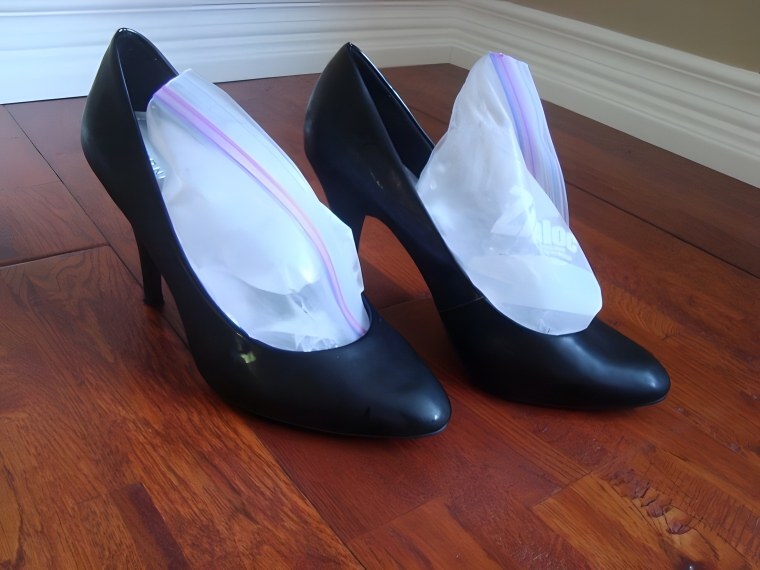
Unfortunately, those of us with wider-than-average feet often struggle to find shoes with a good fit. As a result, you might be forced to put up with tightness that isn’t entirely comfortable and can even hurt at the end of a long day. Thankfully, there’s a simple DIY solution to widening your shoes to fit like a glove! All you’ll need is an airtight bag filled with water. Then, place it in the area of your shoe that feels too tight.
Unfortunately, those of us with wider-than-average feet often struggle to find shoes with a good fit. As a result, you might be forced to put up with tightness that isn’t entirely comfortable and can even hurt at the end of a long day. Thankfully, there’s a simple DIY solution to widening your shoes to fit like a glove! All you’ll need is an airtight bag filled with water. Then, place it in the area of your shoe that feels too tight.
The concept behind this method is based on the fact that water expands as it freezes. When you place the water-filled bag inside your shoes and then put the shoes in the freezer, the water will turn into ice and expand, stretching the material of the shoes. This process can help to create a bit more room in tight areas, making the shoes more comfortable to wear.
To begin, fill a sturdy, airtight plastic bag with water. Make sure the bag is sealed tightly to prevent any leaks. Place the bag inside the shoe, positioning it in the area that feels too tight. You can use multiple smaller bags if you need to target specific spots, such as the toe box or the sides of the shoe.
Once the bags are in place, carefully put the shoes in the freezer. Allow them to sit in the freezer for several hours or overnight, giving the water enough time to freeze completely. As the water turns to ice, it will expand and gently stretch the material of the shoes.
After the water has frozen, remove the shoes from the freezer and let them thaw for about 20-30 minutes. This will make it easier to remove the ice bags without damaging the shoes. Take out the bags and try on the shoes to see if they fit more comfortably. If you need additional stretching, you can repeat the process until you achieve the desired fit.
It’s important to note that this method works best on shoes made from materials that can withstand freezing temperatures, such as leather, canvas, and some synthetic fabrics. Avoid using this technique on delicate or easily damaged materials, as the freezing process could cause cracking or other issues.
In addition to the freezer method, there are other ways to stretch tight shoes. For example, you can use a shoe stretcher, which is a device designed to expand the width and length of shoes. Shoe stretchers are available in various sizes and can be adjusted to target specific areas. Another option is to wear thick socks and use a hairdryer to heat the tight areas of the shoes, then walk around in them to help stretch the material.
Overall, widening shoes in the freezer is a simple and effective DIY solution for those struggling with tight footwear. By using the natural expansion of freezing water, you can create a bit more room in your shoes and enjoy a more comfortable fit. So, if you have a favorite pair of shoes that are just a bit too tight, give this freezer method a try. Your feet will thank you for the extra space and comfort!
Add Heel Patches to Your Favorite Shoes to Extend Their Lifespan
Although the inside of your shoes at the heels aren’t visible when wearing them, they’re often why a pair of shoes are thrown out. Once the lining inside the heel starts to wear, the shoe might start rubbing your ankle and feel uncomfortable or even painful. But if you’re particularly attached to your shoes, there’s no reason to bid them farewell for this alone. You can quickly patch up the damage, unbeknownst to anyone!
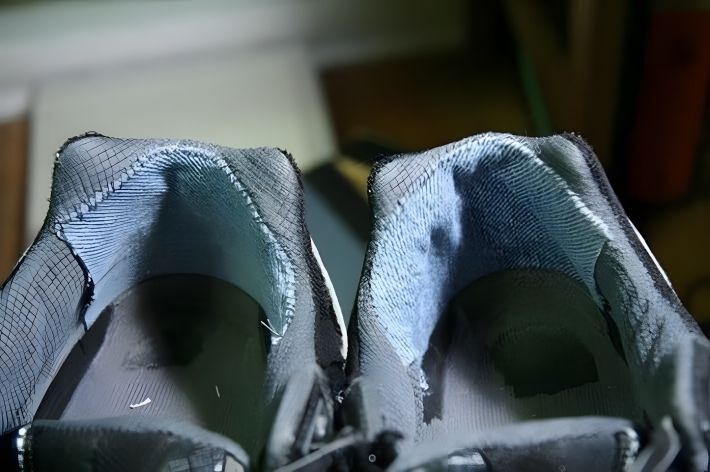
Although the inside of your shoes at the heels aren’t visible when wearing them, they’re often the reason why a pair of shoes are thrown out. The heel area of a shoe experiences a lot of friction and pressure, which can cause the lining to wear out over time. Once the lining inside the heel starts to wear, the shoe might start rubbing your ankle and feel uncomfortable or even painful. This can lead to blisters, calluses, and overall discomfort that makes the shoes unwearable. But if you’re particularly attached to your shoes, there’s no reason to bid them farewell for this alone. You can quickly patch up the damage, unbeknownst to anyone!
One effective solution is to add heel patches to the inside of your shoes. Heel patches are small pieces of durable material that you can sew or glue onto the worn areas of the shoe’s lining. Denim is an excellent choice for patching a worn heel because it’s durable and can withstand a lot of wear and tear. Denim is also relatively easy to work with, making it a practical option for a DIY repair.
To add heel patches to your shoes, start by cleaning the inside of the heel area to remove any dirt or debris. This will help ensure that the patch adheres properly. Next, cut a piece of denim or another durable fabric to the appropriate size. The patch should be large enough to cover the worn area and provide some extra coverage to prevent future wear.
Once you have your patch cut to size, you can attach it to the inside of the shoe using a strong adhesive or by sewing it in place. If you choose to use adhesive, be sure to apply it evenly and press the patch firmly into place. Allow the adhesive to dry completely before wearing the shoes. If you prefer to sew the patch, use a strong needle and thread to stitch around the edges of the patch, securing it to the shoe’s lining.
The needlework required here is pretty basic, so give this hack a go next time your lining starts to wear! Even if you’re not an experienced sewer, you can still achieve a sturdy and effective repair with a little patience and practice. The result will be a rejuvenated pair of shoes that are comfortable to wear and have an extended lifespan.
In addition to denim, you can also use other durable materials for heel patches, such as leather or heavy-duty fabric. The key is to choose a material that can withstand the friction and pressure that the heel area of the shoe experiences. By adding heel patches, you can save your favorite shoes from being prematurely discarded and continue to enjoy wearing them for many more miles.
Overall, adding heel patches to your shoes is a simple and cost-effective way to extend their lifespan and maintain comfort. It’s a practical solution for anyone who wants to preserve their favorite footwear and avoid the discomfort of worn-out heels. So, the next time you notice the lining of your shoe’s heel starting to wear, don’t throw them out – patch them up instead!
Switch to No-Tie Shoelaces
How do you make your day more efficient? There are tons of time-saving hacks out there, but have you ever considered cutting out the time it takes you to tie your shoelaces every morning? Admittedly this should only take you a few seconds. But you can earn this time back by investing in a set of no-tie shoelaces. Not only will this save you time, but they also don’t come untied while you’re out and about.
How do you make your day more efficient? There are tons of time-saving hacks out there, but have you ever considered cutting out the time it takes you to tie your shoelaces every morning? Admittedly this should only take you a few seconds. But you can earn this time back by investing in a set of no-tie shoelaces. Not only will this save you time, but they also don’t come untied while you’re out and about.
No-tie shoelaces are a modern innovation designed to replace traditional laces with a more convenient and efficient alternative. These laces are typically made from elastic materials that allow you to slip your shoes on and off without the need to tie or untie them. They come in various styles and colors, making them a stylish addition to any pair of sneakers or casual shoes.
To switch to no-tie shoelaces, start by removing the traditional laces from your shoes. Next, thread the no-tie laces through the eyelets of your shoes, just as you would with regular laces. Once the laces are in place, you can adjust the tension to achieve a comfortable fit. Most no-tie laces come with locking mechanisms or clips that secure the laces in place, ensuring they stay tight and don’t come undone.
One of the key benefits of no-tie shoelaces is the convenience they offer. Once you’ve added them to your shoes, you can simply slip your feet in and out without the hassle of tying and untying laces. This can be especially useful for individuals with mobility issues, children, or anyone who wants to save a few seconds in their daily routine.
In addition to saving time, no-tie shoelaces also provide a secure and consistent fit. Traditional laces can sometimes come undone or loosen throughout the day, requiring frequent adjustments. With no-tie laces, you can enjoy a snug and comfortable fit that stays in place, allowing you to focus on your activities without worrying about your shoes.
All in all, no-tie shoelaces are a quick, safe, and stylish solution for your sneakers. They are available in various designs, from simple and functional to colorful and decorative, allowing you to customize your look. Whether you’re heading to the gym, going for a run, or just running errands, no-tie laces can make your life a little easier and more efficient.
Once you’ve added them to your shoes, enjoy slipping into them in the morning and being ready to go – you won’t look back! The convenience and reliability of no-tie shoelaces make them a worthwhile investment for anyone looking to streamline their daily routine and enhance their footwear experience.
Tape Your Toes to Ease Aching Feet From Wearing Heels
Aching feet are the worst part of wearing high heels. The pain often results from putting too much pressure on the nerve between your second and third toes. However, a simple way to relieve that tension is to tape the offending toes together! Warning: Don’t accidentally wrap them so tightly that you cut off circulation – otherwise, this will have the opposite result! Instead, position the tape to provide just enough support and protection.
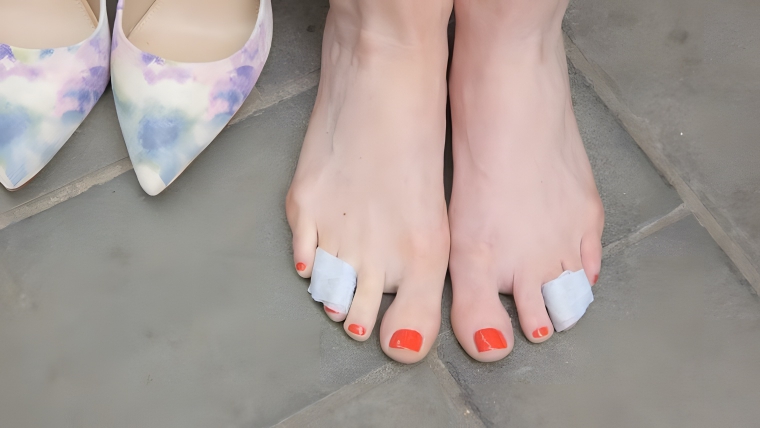
Aching feet are the worst part of wearing high heels. The pain often results from putting too much pressure on the nerve between your second and third toes. This pressure can lead to discomfort, pain, and even numbness in the toes and ball of the foot. However, a simple way to relieve that tension is to tape the offending toes together! This method can help to distribute the pressure more evenly and reduce the strain on the nerve.
To tape your toes, you’ll need some medical tape or gauze. Start by cutting a piece of tape long enough to wrap around your second and third toes. Position the tape so that it provides support without being too tight. Warning: Don’t accidentally wrap them so tightly that you cut off circulation – otherwise, this will have the opposite result! Instead, position the tape to provide just enough support and protection.
Begin by placing one end of the tape at the base of your second toe and wrapping it around both the second and third toes. Be sure to keep the tape flat and smooth to avoid any uncomfortable bunching or pinching. Once the tape is in place, gently press it down to ensure it adheres well to your skin.
Doing so will make walking and standing in heels more comfortable. By taping the toes together, you create a stronger and more stable structure that can better handle the pressure and weight distribution that comes with wearing high heels. This simple technique can make a significant difference in your comfort level, especially if you need to wear heels for extended periods.
You can use gauze or medical tape for this purpose. Gauze is soft and flexible, making it a comfortable option for taping your toes. Medical tape is also a good choice, as it is designed to be gentle on the skin and provide secure adhesion. There are even dedicated toe wraps that you can purchase online! These wraps are specifically designed to provide support and protection for your toes, making them a convenient and effective solution.
In addition to taping your toes, consider other strategies to reduce foot pain when wearing heels. For example, choose high heels with lower or chunkier heels, as they provide better support and stability. Look for shoes with cushioned insoles or consider adding gel inserts to provide extra padding and shock absorption. Taking breaks to sit down and rest your feet can also help to alleviate discomfort.
Overall, taping your toes is a simple and effective way to ease aching feet from wearing heels. By providing additional support and reducing pressure on the nerve between your toes, this technique can help you enjoy the elegance and style of high heels without the associated pain. So, the next time you slip into your favorite pair of heels, give this toe-taping method a try. Your feet will thank you for the extra comfort and relief!
Use Bread to Clean Suede Shoes
Are you one of those people that don’t eat the end piece of a loaf of bread? If you have a pair of suede shoes you want to keep clean, don’t throw that bread away just yet! Instead, you can use it to clean your suede shoes. Suede is a reasonably delicate material that’s a bit harder to clean. However, primping your suede shoes every now and then should be a priority if you want them to go the distance.
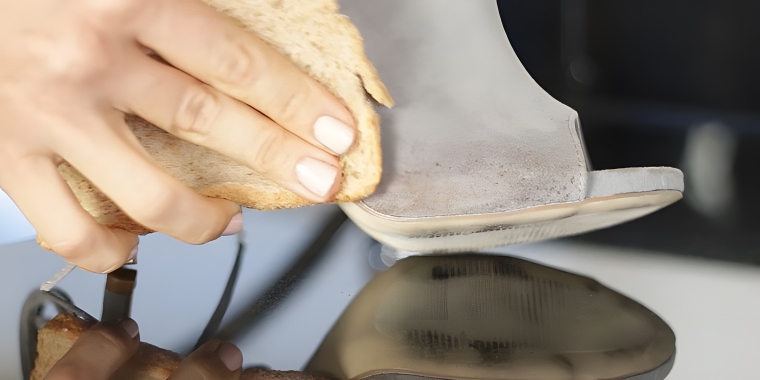
Are you one of those people that don’t eat the end piece of a loaf of bread? If you have a pair of suede shoes you want to keep clean, don’t throw that bread away just yet! Instead, you can use it to clean your suede shoes. Suede is a reasonably delicate material that’s a bit harder to clean compared to other types of leather. It has a soft, velvety texture that can easily be damaged by water, harsh chemicals, or abrasive brushes. However, primping your suede shoes every now and then should be a priority if you want them to go the distance.
Suede shoes can accumulate dirt, dust, and stains over time, making them look worn and less attractive. Traditional cleaning methods, such as using soap and water, can often do more harm than good, as they can leave watermarks and cause the suede to stiffen. But, unfortunately, lots of fabrics and brushes can scratch or damage the suede. So, instead, consider using a simple and unconventional method: bread.
Yes, you read that right. The end piece of a loaf of bread, also known as the heel, can be an effective tool for cleaning suede shoes. The slightly rough texture of the bread can help to lift dirt and stains from the suede without causing damage. To use this method, take the end piece of bread and gently rub it over the stained or dirty areas of your suede shoes. Use a consistent, circular motion to work the bread into the suede, allowing it to absorb the dirt and grime.
As you rub the bread on the suede, you’ll notice that it starts to crumble and break apart. This is normal and indicates that the bread is working to lift the dirt from the material. Continue rubbing until the stains disappear or the suede looks cleaner. Once you’re satisfied with the results, gently brush off any remaining bread crumbs using a soft-bristled brush or a suede brush. Be sure to brush in the direction of the suede’s nap to maintain its texture and appearance.
You’ll be amazed at the results! This simple and cost-effective method can help to restore the look of your suede shoes, making them look fresh and clean once again. Plus, it’s a great way to repurpose a piece of bread that might otherwise go to waste. By taking a few minutes to clean your suede shoes with bread, you can extend their lifespan and keep them looking their best.
In addition to using bread, there are other gentle cleaning methods you can try for suede shoes. For example, a white eraser can be used to remove small stains and scuffs, while a mixture of white vinegar and water can help to tackle more stubborn stains. Just be sure to test any cleaning method on a small, inconspicuous area of the shoe first to ensure it doesn’t cause damage.
Overall, using bread to clean suede shoes is a simple, effective, and eco-friendly solution for maintaining the appearance of your favorite footwear. So, the next time you notice your suede shoes looking a bit dirty, don’t reach for harsh chemicals or abrasive brushes – grab a piece of bread instead!
Add Glue to the Soles of Your Shoes for More Grip
Are you looking to add more grip to your shoes to ensure you don’t slip and fall while you’re out and about? If so, glue could do the trick. We propose using a hot glue gun to apply three lines of glue to the sole of your shoes. Then, wait for them to dry and cool, so they’ve hardened into tracks to create more friction underfoot. No one sees the soles of your feet, so you don’t have to worry about them looking tacky.
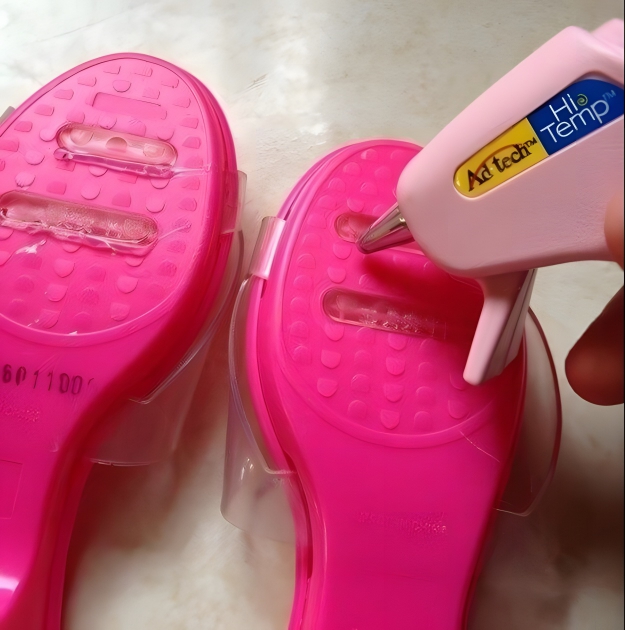
Are you looking to add more grip to your shoes to ensure you don’t slip and fall while you’re out and about? If so, glue could do the trick. Slippery shoes can be a safety hazard, especially on wet or uneven surfaces. Whether you’re walking on a rainy day, navigating icy sidewalks, or simply moving around on a slick floor, having good traction is essential to prevent accidents and injuries.
One simple and effective way to add more grip to your shoes is by using a hot glue gun. Hot glue is a versatile adhesive that can be used for a variety of DIY projects, including adding traction to your shoe soles. To do this, you’ll need a hot glue gun and some glue sticks. Once you have your supplies ready, follow these steps to add more grip to your shoes.
First, make sure the soles of your shoes are clean and dry. Any dirt, dust, or moisture can prevent the glue from adhering properly. Use a damp cloth to wipe down the soles and allow them to dry completely before proceeding. Next, plug in your hot glue gun and let it heat up. Once the glue gun is ready, carefully apply three lines of glue to the sole of each shoe. You can create horizontal, vertical, or diagonal lines, depending on the design of your shoe soles and where you need the most traction.
The key is to apply the glue in a way that creates raised tracks on the sole. These tracks will help to create more friction underfoot, providing better grip on slippery surfaces. Be sure to apply the glue evenly and avoid making the lines too thick, as this can make the shoes uncomfortable to walk in. Once you’ve applied the glue, wait for it to dry and cool completely. The glue will harden into tracks that create more friction underfoot.
No one sees the soles of your feet, so you don’t have to worry about them looking tacky. This method is a discreet and practical solution for improving the traction of your shoes. However, there’s a good chance that the glue won’t be a permanent solution, as the glue will eventually rub off with regular use. Still, we think it’s a decent cheap, albeit temporary, answer if you’re looking for a quick and easy fix to adding some grip to your shoes.
If you find that the glue wears off over time, you can simply reapply it as needed. This method is particularly useful for shoes that you wear occasionally or for specific activities, such as hiking, running, or walking on slippery surfaces. For a more permanent solution, you might consider using adhesive traction pads or sole protectors, which are designed to provide long-lasting grip.
Overall, adding glue to the soles of your shoes is a simple and cost-effective way to improve traction and prevent slips and falls. It’s a quick DIY solution that can make a big difference in your safety and comfort, especially in challenging conditions. So, the next time you need a little extra grip, grab your hot glue gun and give this method a try!
Give Your Old Shoes a Makeover
If you own an old pair of shoes and you’re thinking of chucking them, don’t throw your old shoes away just yet! You can do plenty with a bit of creativity. There are lots of tutorials online for giving your shoes a complete makeover. You can add lacey details, paint, fabric, pearls, and other decorations to create one-of-a-kind shoes that suit your personality. Granted, making over a shoe is a bit of a project.
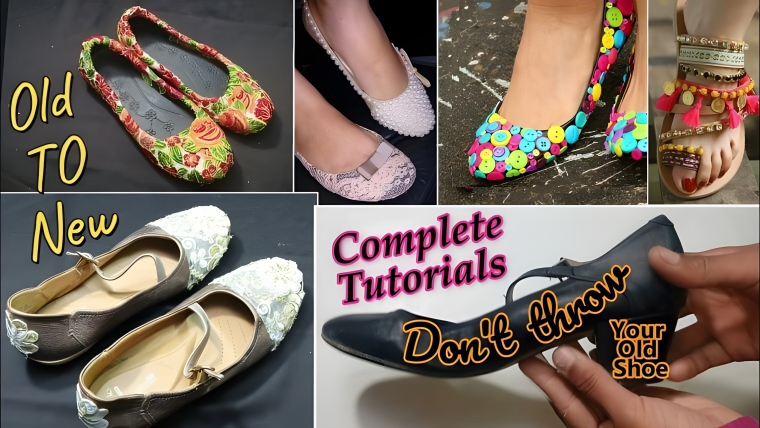
If you own an old pair of shoes and you’re thinking of chucking them, don’t throw your old shoes away just yet! You can do plenty with a bit of creativity. Old shoes can often be transformed into something new and exciting with just a few simple DIY techniques. Whether you’re looking to refresh their appearance, fix minor issues, or completely reinvent them, there are endless possibilities for giving your old shoes a new lease on life.
One of the most popular ways to give your old shoes a makeover is by adding decorative elements. There are lots of tutorials online for giving your shoes a complete makeover. You can add lacey details, paint, fabric, pearls, and other decorations to create one-of-a-kind shoes that suit your personality. For example, you can use fabric paint to create custom designs or patterns on your shoes. This is a great way to express your creativity and make your shoes truly unique.
Another option is to use fabric or lace to cover certain areas of the shoe. This can be done using fabric glue or a hot glue gun. You can create intricate designs or simply cover worn or damaged areas to give the shoes a fresh look. Adding pearls, rhinestones, or other embellishments can also add a touch of elegance and glamour to your shoes. These decorative elements can be glued onto the shoes in any pattern or arrangement you like.
Granted, making over a shoe is a bit of a project. It requires some time, patience, and a willingness to experiment with different materials and techniques. But if you’re someone who loves getting creative with arts and crafts, this can be a fun and rewarding project. Plus, it’s a great way to breathe new life into shoes that you might otherwise discard.
In addition to decorative makeovers, you can also make functional improvements to your old shoes. For example, you can replace worn-out insoles with new, cushioned ones to improve comfort. Adding heel or toe pads can also help to extend the life of your shoes and make them more comfortable to wear. If the soles are worn out, you can take the shoes to a cobbler to have them resoled, which can significantly extend their lifespan.
There are also plenty of ways to customize your shoes to better suit your needs. For example, if you have a pair of shoes that are slightly too tight, you can use a shoe stretcher to gently expand them. If the shoes are too loose, adding heel grips or insoles can help to achieve a better fit. You can also experiment with different lacing techniques to improve the fit and comfort of your shoes.
But if you’re looking for a new project, we think some of the shoe-renewal ideas on the web are great! They allow you to transform old, worn-out shoes into something new and exciting, all while expressing your creativity and personal style. So, before you decide to throw out your old shoes, consider giving them a makeover. With a little creativity and effort, you can turn them into a unique and stylish pair of shoes that you’ll love to wear.
Soak Fleece-Lined Slippers in Dish Soap Solution
Fleece-lined slippers are a popular Christmas gift, and it’s not difficult to see why! They never go amiss in winter when the floors at home are cold, and your feet never seem to get warm enough. However, the one downside to slippers like these is that they tend to soak up your sweat. Consequently, they perpetrate a terribly vinegary smell after a while. Fortunately, cleaning fleece-lined slippers is easier than you might think.
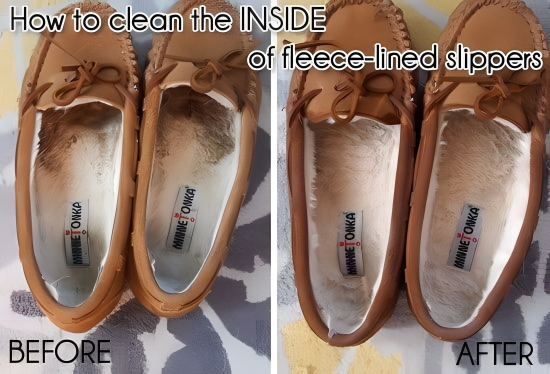
Fleece-lined slippers are a popular Christmas gift, and it’s not difficult to see why! They never go amiss in winter when the floors at home are cold, and your feet never seem to get warm enough. These cozy slippers provide the perfect solution to chilly toes, offering warmth and comfort during the colder months. However, the one downside to slippers like these is that they tend to soak up your sweat. As you wear them day in and day out, the fleece lining absorbs moisture from your feet, which can lead to a buildup of bacteria and unpleasant odors. Consequently, they perpetrate a terribly vinegary smell after a while.
Fortunately, cleaning fleece-lined slippers is easier than you might think. With just a few simple steps, you can restore your slippers to their former fresh and clean state. First, gather your cleaning supplies. You’ll need a basin or sink, warm water, and a few tablespoons of dish soap. Dish soap is an effective cleaner because it breaks down oils and grease, which can help to remove sweat and dirt from the fleece lining.
Begin by filling the basin or sink with warm water. The water should be comfortably warm but not hot, as excessively hot water can damage the fleece material. Add a few tablespoons of dish soap to the water and stir to create a soapy solution. Once the solution is ready, place your slippers in the basin, making sure they are fully submerged. Allow the slippers to soak in the soapy water for a few minutes. This soaking process helps to loosen dirt and grime from the fleece lining, making it easier to clean.
After soaking, take a soft cloth or sponge and gently scrub the inside of the slippers. Pay special attention to any stained or heavily soiled areas. The dish soap solution should help to lift away dirt and odors as you scrub. Once you’re satisfied with the cleaning, rinse the slippers thoroughly with clean water to remove any soap residue. It’s important to ensure that all soap is rinsed out, as leftover soap can attract more dirt and cause the slippers to become sticky.
After rinsing, gently squeeze out excess water from the slippers. Avoid wringing or twisting the slippers, as this can damage the fleece lining. Instead, press down on the slippers to remove as much water as possible. Finally, let the slippers air dry in a well-ventilated area. Avoid placing them in direct sunlight or using a heat source to speed up the drying process, as this can cause the fleece to become stiff or shrink.
By following these simple steps, you can keep your fleece-lined slippers clean and fresh, ensuring they provide warmth and comfort for many winters to come. Regular cleaning can also help to extend the lifespan of your slippers, making them a worthwhile investment in your comfort and well-being.
Avoid Sweaty Shoes With Panty Liners
We probably don’t have to tell you that panty liners are made from super absorbent material and do a great job keeping moisture and smell at bay. Yes, you’ve guessed where this is going… If you’re not put off by slightly untraditional solutions, we have a hack to stop you from suffering from sweaty feet. Just stick panty liners into your shoes before you put them on for the day!
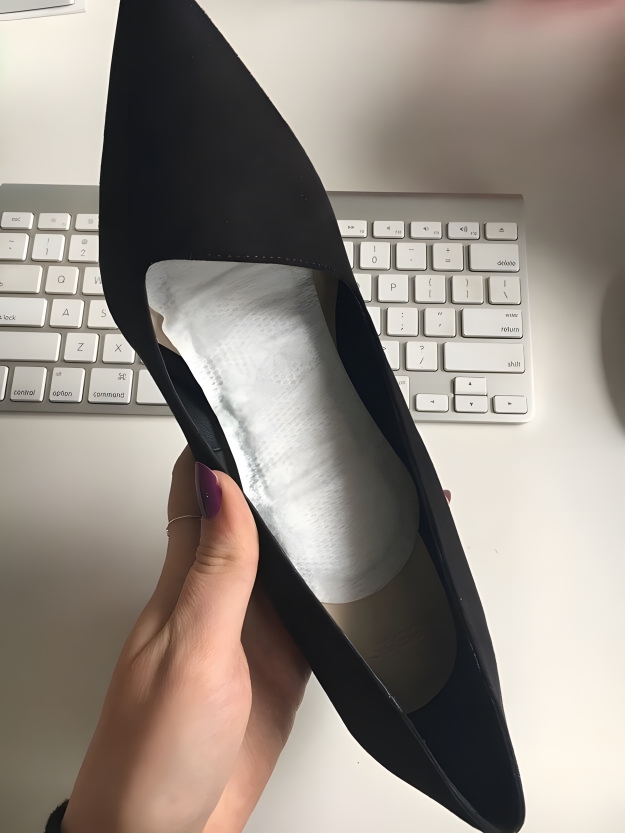
We probably don’t have to tell you that panty liners are made from super absorbent material and do a great job keeping moisture and smell at bay. Panty liners are designed to be discreet and comfortable, providing an extra layer of protection against moisture. Yes, you’ve guessed where this is going… If you’re not put off by slightly untraditional solutions, we have a hack to stop you from suffering from sweaty feet. Just stick panty liners into your shoes before you put them on for the day!
This unconventional method leverages the absorbent properties of panty liners to keep your feet dry and comfortable. Panty liners are designed to wick away moisture, trapping it within the liner and preventing it from reaching your shoes. This can be particularly useful during hot weather or for individuals who naturally have sweaty feet. By placing a panty liner in each shoe, you create a barrier that absorbs sweat throughout the day.
Not only are they relatively cushioned and comfortable, but they’ll, more importantly, soak up all the sweat, keeping your feet nice and dry. The soft, cushioned surface of the panty liner also adds a layer of comfort to your shoes, making them more pleasant to wear. This can be especially beneficial for shoes with hard insoles or minimal padding. The liners help to reduce friction and prevent blisters, enhancing overall foot comfort.
Remember to change the panty liner to avoid germs sticking around after each use. Just like with any absorbent material, panty liners can harbor bacteria if not changed regularly. It’s important to replace the liners daily or whenever they become saturated to maintain hygiene and prevent odors. Simply peel off the used liner and replace it with a fresh one before putting on your shoes.
This method is cost-effective and easy to implement, making it a practical solution for anyone dealing with sweaty feet. Panty liners are widely available and inexpensive, making them an accessible option for most people. Additionally, they are easy to carry in your bag or pocket, allowing you to change them as needed throughout the day.
Overall, using panty liners in your shoes is a clever and effective way to combat sweaty feet and keep your shoes fresh. It’s a simple hack that can make a big difference in your comfort and confidence, especially during hot weather or long days on your feet. So, the next time you’re looking for a way to stay dry and comfortable, give this unconventional method a try!
Stop Shoes From Chafing With K-Y Jelly
Chafing occurs when the skin rubs against other materials repeatedly. When you wear your shoes day in, and day out, even the slightest misalignment between the back of your heels and your foot can cause repeated rubbing and chafing. One way to prevent chafing and relieve the pain that comes with it is to apply K-Y jelly. The jelly reduces friction. We recommend applying a jelly layer before intensive activities like running or hiking.
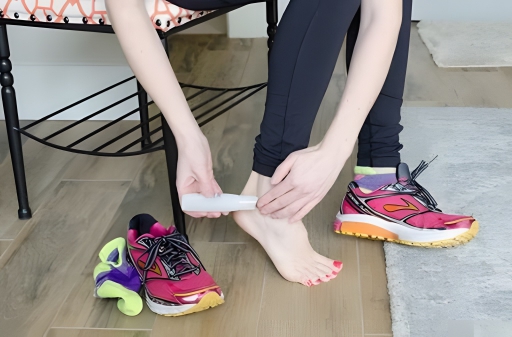
Chafing occurs when the skin rubs against other materials repeatedly. When you wear your shoes day in and day out, even the slightest misalignment between the back of your heels and your foot can cause repeated rubbing and chafing. This friction can lead to painful blisters, irritation, and even open sores, making it uncomfortable to walk or wear your shoes. One way to prevent chafing and relieve the pain that comes with it is to apply K-Y jelly. K-Y jelly is a water-based lubricant that reduces friction and provides a protective barrier between your skin and the shoe.
The jelly reduces friction by creating a smooth, slippery surface that allows your skin to glide more easily against the shoe. This can help to prevent the rubbing and irritation that leads to chafing. To use K-Y jelly for this purpose, start by identifying the areas of your feet that are most prone to chafing. Common problem areas include the back of the heels, the sides of the feet, and the toes.
We recommend applying a jelly layer before intensive activities like running or hiking. These activities often involve repetitive movements that can exacerbate chafing, so applying K-Y jelly beforehand can help to protect your skin. Simply squeeze a small amount of jelly onto your fingers and apply it to the problem areas. Be sure to spread the jelly evenly and cover the entire area to ensure maximum protection.
As a quick home remedy, it doesn’t take long to apply and can offer extra protection from discomfort. K-Y jelly is easy to find at most drugstores and is inexpensive, making it a convenient solution for chafing. It’s also water-based, so it won’t stain your shoes or leave a greasy residue. This makes it a practical option for everyday use, whether you’re going for a run, heading to work, or just running errands.
Be sure to target problem areas like the ankles or at the heels. These areas are particularly prone to chafing because they experience the most friction and pressure. By applying K-Y jelly to these spots, you can create a protective barrier that reduces the risk of irritation. If you find that the jelly wears off over time, you can reapply it as needed to maintain protection.
In addition to using K-Y jelly, there are other strategies you can try to prevent chafing. For example, wearing moisture-wicking socks can help to keep your feet dry and reduce friction. Choosing shoes that fit properly and provide adequate support can also make a big difference. If your shoes are too tight or too loose, they can cause excessive rubbing and increase the risk of chafing.
Overall, using K-Y jelly to prevent chafing is a simple and effective home remedy that can provide relief from discomfort and protect your skin. It’s a quick and easy solution that can make a big difference, especially during activities that involve a lot of movement. So, the next time you experience chafing, give K-Y jelly a try and enjoy the added comfort and protection it provides.