1.Fixing A Dent With Hot Water & A Plunge
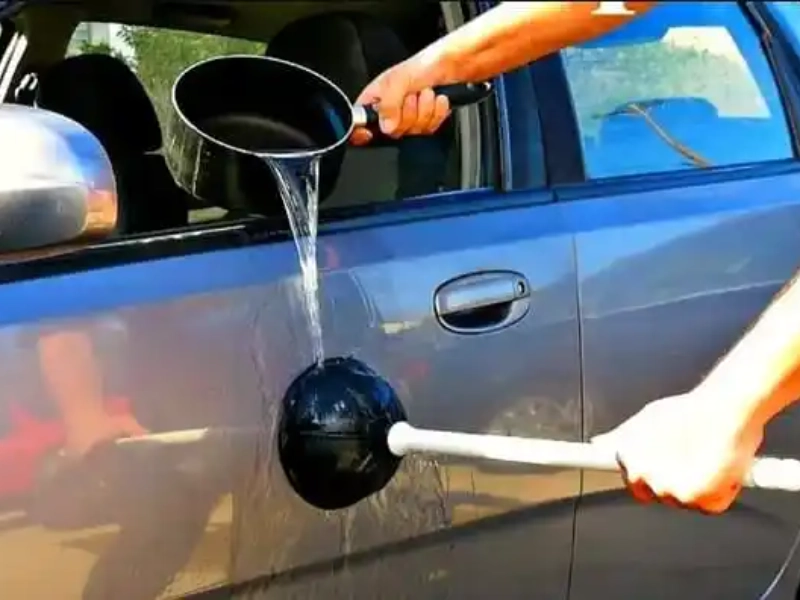
Though it can be annoying and ugly, dental problems on your car are not insurmount. Before calling in costly expert repairs, try a basic and reasonably priced fix right at home. Many automobile owners have used the popular do-it-yourself approach known as the hot water and plunger method to aid their car’s outside look to be smooth once more.
You will first need to compile a few basic items: a kettle or pot for boiling water, a plunger—ideally a clean one free from plumbing use—and protective gloves to guard against burns. Metal parts may be more resistant to this approach, so the process performs better on plastic bumpers and body panels.
Starting with enough water boiling in your kettle or saucepan, Examine the dented area closely to make sure there are no paint chips or cracks that can get worse with heat’s application while the water is heating up. Once the water reaches boiling point, gently pour it over the dented section such that the whole impacted surface is covered. The plastic or metal expands from the hot water, which increases its pliable nature and simplicity of manipulation.
Take your plunger right away after adding the hot water and lay it squarely over the middle of the dent. Create a seal by firmly pressing the plunger to the surface; then, draw outward quickly and forcefully. Many times, you’ll hear a pleasing “pop” as the dent relaxes and the surface takes on its natural form. Don’t get frustrated if the dent doesn’t come out totally on the first try. You might have to go through the procedure several times, warming the area between tries with more hot water.
It should be mentioned that this approach might not apply on all vehicle surfaces or for all kinds of damages. Deep wrinkles, sharp edge dents, or damage to substantially reinforced parts of the car body could call for expert care. Furthermore, should the body of your car have significant damage, this do-it-yourself repair might not be enough to completely restore its look.
Once the dent has been taken out, let the area naturally cool. After cool-down, closely check the surface for any last flaws. Sometimes you could find minor waviness or unevenness in the paint. Although the dent removal technique will greatly enhance the look of your vehicle, it could not always get it back to factory-perfect condition. On most tiny dents, however, this approach can make a significant impact and save you a good deal of money on expert repairs.
Remember to guard your hands and skin from possible burns and use care while handling hot water. It’s always advisable to see a professional auto body repair specialist who can evaluate the damage and advise the most suitable course of action whether you’re not confident about trying this repair yourself or if the dent is especially serious.
2.Dirty Headlights And Toothpaste
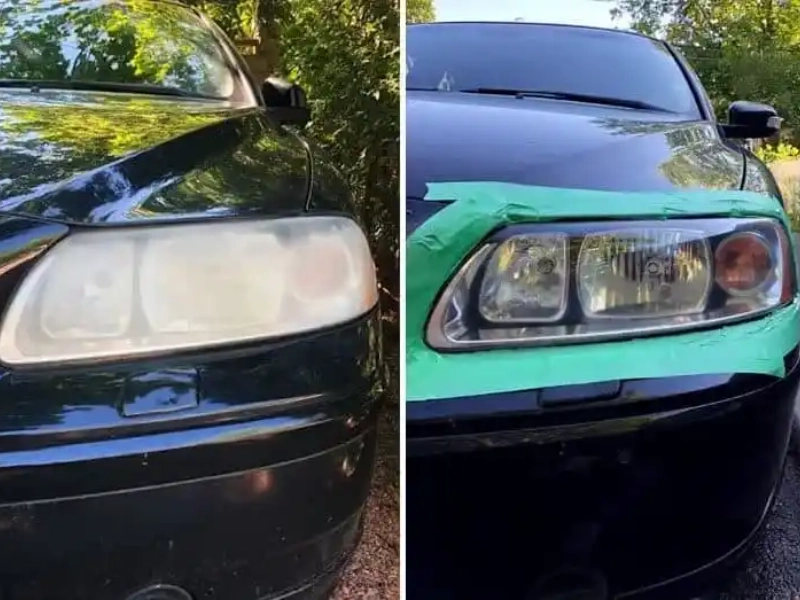
In addition to being unsightly, foggy headlights seriously reduce visibility while driving at night, so endangering safety. Try this basic and cheap fix utilising an everyday household item: toothpaste before you dash out to buy costly headlight repair kits or think about totally replacing your headlights.
The secret to this unexpected trick is the modest abrasives most toothpaste contain. Designed to remove stains and plaque from your teeth, these abrasives will also help to shine the surface of your headlights. The procedure reveals the clear plastic underlying by softly removing the oxidised layer on the headlight lens.
First you’ll need a soft cloth or sponge, water, some elbow grease, a container of ordinary white toothpaste—avoid gel formulations—and To get any loose dirt or trash, start by thoroughly washing the headlights with soap and water. Before moving forward, totally dry the surface.
Apply then a lot of toothpaste to your sponge or rag. Start rubbing the toothpaste on the headlight lens in circles. Work the toothpaste into the surface applying strong, steady pressure. Good indication that the process is functioning is the cloth being discoloured as it absorbs the oxidised material from the headlight.
Rub for several minutes, being careful to evenly cover the headlight’s whole surface. You could have to use more toothpaste and spend more time on very tough foggy regions. Scrubbing for five to ten minutes should produce toothpaste residue that you can rinse off with clean water. Examine your work and dry the headlamp with a fresh, lint-free towel.
After only one application, you will often find that the clarity of your headlights has greatly improved. To get the desired effects, though, you might have to repeat the procedure several times for headlights experiencing significant oxidation. Since several treatments may often bring even the most foggy headlights to a like-new state, be patient and tenacious.
Although this approach works well for many varieties of foggy headlights, it might not apply in every situation. The toothpaste approach won’t work if the yellowing or cloudiness originating from inside the headlight assembly is brought on by moisture or another internal problems. Under such circumstances, you could have to think about expert headlight unit replacement or restoration.
Once your headlights have been thoroughly cleaned, think about covering the freshly polished surface from further oxidation with a UV-resistant clear lacquer or headlight sealer. This extra step can assist your headlights stay clear longer and stop regular cleaning from being necessary.
Recall that safe nighttime driving depends critically on clean, clear headlights. They not only increase your road visibility but also make sure other drivers may plainly see you. Without breaking the budget, regular maintenance of your headlights—including this easy toothpaste cleaning approach—can greatly improve the look and safety of your car.
3.Opening Your Keyring With A Staple Remover
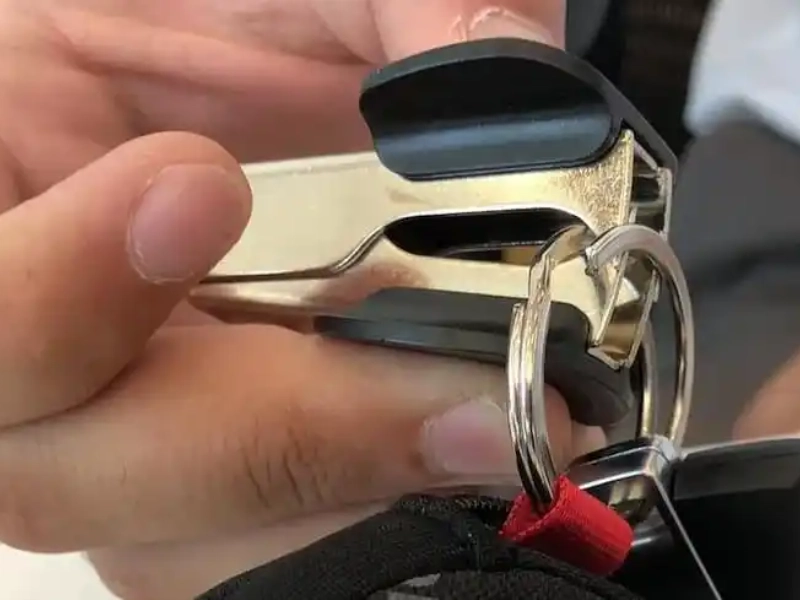
Many people have suffered with aching fingers and cracked nails from the universal experience of trying to add or remove keys from a tight metal keyring. But most companies and houses have a basic remedy right under sight: the modest staple remover. This clever trick turns a basic office supply into a great tool for effortlessly and quickly managing your keys.
With two sets of opposing teeth, a standard staple remover is exactly suited for prying free the tightly twisted metal of a keyring. Easily slipping between the ring’s coils, the teeth offer the leverage required to produce a gap large enough for keys to slide on or off without effort. This approach not only spares your fingers from discomfort but also stops possible damage to your nails or the keys themselves.
Start by finding a staple remover; the normal desk variety will work just fine using this approach. Orient the staple remover such that its teeth lie on either side of the split in the keychain. As you would be removing a staple from a document, gently squeeze the handles of the staple remover together. The teeth will press apart the two ends of the keychain as you do this to produce a gap.
The staple remover’s keyring lets you quickly put fresh keys onto the ring or remove old ones without any effort. You’ll wonder why you haven’t been doing it all along since the method is so straightforward and efficient. Those with arthritis or other hand mobility problems will find this approach especially helpful since it greatly lessens the force and dexterity needed to handle a keyring.
Apart from its main application for keys, this trick works for other such objects. For instance, you might use a staple remover to add or remove charms from a charm bracelet or to work with other kinds of small metal rings used in jewellery manufacturing or crafts. The adaptability of this method makes the staple remover an unexpectedly useful instrument for many home projects.
Although this approach is good for basic keychains, it could not be appropriate for all kinds. Certain high-security or specialised keyrings might have distinct systems that a staple remover could compromise. Apply this approach always with care and common sense; if you run against unusual opposition, stop and look for another approach.
This hack can be a tremendous time-saver for people who regularly need to add or remove keys, including those working in an automobile dealership or property managers. It enables rapid and effective key management free from the requirement for specialist tools. It also lessens the strain on your fingertips from constantly battling tight keychains all through the day.
More broadly, this deft use of a staple remover is a prime example of the kind of innovative problem-solving that may somewhat simplify daily life. It reminds us to see everyday products from fresh angles and ponder how their design may be used to address unrelated issues. In both personal and professional environments, this style of lateral thinking can produce a great range of creative ideas.
Therefore, instead of bracing for a fight with your keys the next time you discover a difficult keychain opt for a staple remover. Your fingers will reward you, and you’ll be happy knowing you’ve perfected a basic but powerful life hack that will save years’ worth of time and aggravation.
4.Put A Shower Caddy In The Trunk
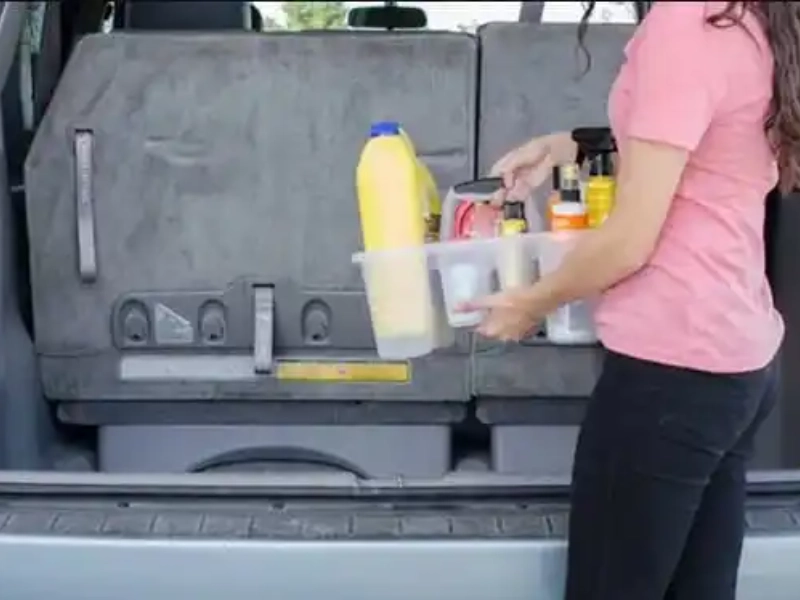
Especially with regard to keeping necessary emergency supplies and maintenance tools, organising your car’s trunk might be a difficult chore. These usually wind up all around the trunk and are challenging to locate when most needed. Now enter the shower caddy, a surprising but very useful way to keep the trunk of your car orderly, ready for any scenario.
The idea is straightforward but clever: use a shower caddy—usually used for bathroom basics—as a portable trunk for your automobile. Using the caddy’s compartmentalised architecture—which is ideal for organising and storing different automotive supplies—this clever trick makes use of Every item—including motor oil, windscreen washer fluid, a funnel, rags, a torch, jumper cables, and other emergency supplies—has a place in the caddy.
Start with choosing a suitable shower caddy to apply this organisation technique. Look for one with several sized sections to hold different kinds of supplies. Because they are lightweight, robust, and easily cleaned, plastic caddies are usually the ideal option for this use. Certain caddies even have handles, which makes carrying and moving about simple as needed.
Once you have your caddy, count the usually kept goods in your trunk for routine maintenance or emergencies. Sort these by size and type; then start arranging them in the compartments of the caddy. Smaller objects like fuses, light bulbs or a tyre pressure gauge can be kept in the smaller side pockets; larger objects like bottles of oil or washers fluid can put in the main compartment.
To further arrange little objects within the caddy, think about using zip-lock bags or clear, compact plastic containers. This extra step helps you to quickly find what you need and helps minor parts not to be misplaced. For unplanned delays, you might also choose to take a simple toolkit, a first-aid kit, and some snacks or water bottles.
One of the main benefits of applying a shower caddy this manner is its portability. Should an emergency or breakdown strike, you may quickly remove the whole caddy from the trunk to carry all of your necessities in one handy bag. If you have to work on your car far from where it’s parked or if you have to move supplies to another automobile, this can really help.
The shower caddy approach also keeps stains and spills off your trunk. Including possibly messy goods like oil or other fluids within the caddy helps lower the possibility of these chemicals seeping into the carpet or upholstery in your trunk. Should a leak take place, cleaning the caddy or replacing it totally is more simpler than handling a soiled trunk.
Your car caddy needs regular maintenance to stay a useful organising tool. Review the contents often; replace any used-up goods and make sure everything is in good condition. This daily check can also be a reminder to become familiar with the whereabouts of every object so you may be ready should an emergency strike.
The shower caddy idea can be extended for those who drive for hobbies or employment requiring particular tools. Different kinds of products can be arranged among several caddies: one for work tools, another for car maintenance, and maybe a third for leisure equipment. This approach keeps your trunk orderly no matter how you use your car and lets you quickly customise depending on your particular demands.
Using the shower caddy trunk organiser will help you to maximise the storage area in your vehicle in a basic yet efficient manner. Knowing that you’re ready for whatever the road may bring not only gives peace of mind but also helps you to maintain your emergency and maintenance supplies orderly and easily available. This smart reusing of a common home item shows how a little imagination may produce workable answers for daily problems.
5.Use Pool Noodles To Prevent Car Dings
Many drivers find it frequent and annoying when car dings and dents from inadvertently striking garage walls show up. These little mishaps can cause ugly damage and maybe expensive repairs. But pool noodles offer a straightforward, reasonably priced, and shockingly powerful way to help save your garage walls and automobile.
Excellent shock absorbs and protective barriers in your garage can be made from pool noodles, those vibrantly coloured foam tubes usually used in swimming and water play. Using the noodle’s soft, flexible character, this ingenious hack produces a cushioned surface capable of absorbing small impacts and thereby preventing harm.
First, evaluate your garage to find the places your car door most likely to come into touch with the wall. Then, apply this creative idea. These areas may already exhibit evidence of scuffs or markings from past accidents, hence they are usually easy to find. It’s time to get ready your pool noodle protection system after you have found these risk areas.
First, find the height your car door usually strikes the wall. Cutting your pool noodle to a length that amply covers this area will help you to provide some additional coverage above and below the primary impact point. Usually five to six feet long, a regular pool noodle is plenty for this use. If you need more covering, though, you might go for extra-long noodles or use several noodles.
After that, you will have to cut the pool noodle lengthwise to form a C-shaped form fit for wrapping around your garage wall. This cut gives a larger protecting surface and lets the noodle more firmly grab the wall. This stage calls for a sharp utility knife or scissors, being cautious to cut straight, evenly throughout the noodle’s length.
Your noodle is ready to be fastened to the wall. Depending on your inclination and the kind of wall surface you are working with, there are many techniques you might employ for this. Strong adhesive strips—like those used for hanging pictures—or heavy-duty double-sided tape can work nicely for a temporary fix. Should it be necessary, these choices let for simple removal or repositioning.
Screws or bolts will help you to fasten the noodle to the wall for a more permanent placement. If you use this approach, ensure sure the pressure is distributed using washers to stop the screws from dragging through the foam. Alternatively, you might hold the noodle in place with a basic bracket system made of tiny plastic or wood bits.
Install the noodle such that the C-shaped open side faces outward, away from the wall. This configuration lets the noodle absorb the stress and shield your car door and the wall from modest compression upon collision. Verify that the noodle is tightly secured and does not move or slide under touch.
Especially in darkly lit garages, think about using vividly coloured pool noodles for extra visibility. The vivid colours of these foam tubes act as a visual cue of the protective barrier, guiding you away from the area when parking or pulling out from your car. For a more unified appearance, you may even match the colour to your garage or automobile.
Although this pool noodle hack is meant mostly to prevent door dings, it may easily be modified for other parts of your garage. When pulling into a tight area, you might cushion low-hanging pipes, cover wall corners, or guard your car’s bumper using extra noodles.
Although pool noodles are great for avoiding little dings and scratches, they might not be enough defence against more strong blows. Parking and leaving your car should always be done with care; never rely just on the noodles to stop mishaps.
Your pool noodle protection system should be routinely inspected and maintained. Replace the noodles as needed and often look for wear or damage. This easy fix can offer your garage and automobile long-lasting protection with correct upkeep.
One excellent illustration of how commonplace objects could be used to address common concerns is the pool noodle garage protector. Dealing with car dings and wall damage can cause aggravation and expense; this is a cheap, simple fix that will save you both. Your garage’s safer, more forgiving surroundings for your car will result from your innovative thinking and use of easily obtained resources.
6.Need A Trash Bin? Use Cereal Bins
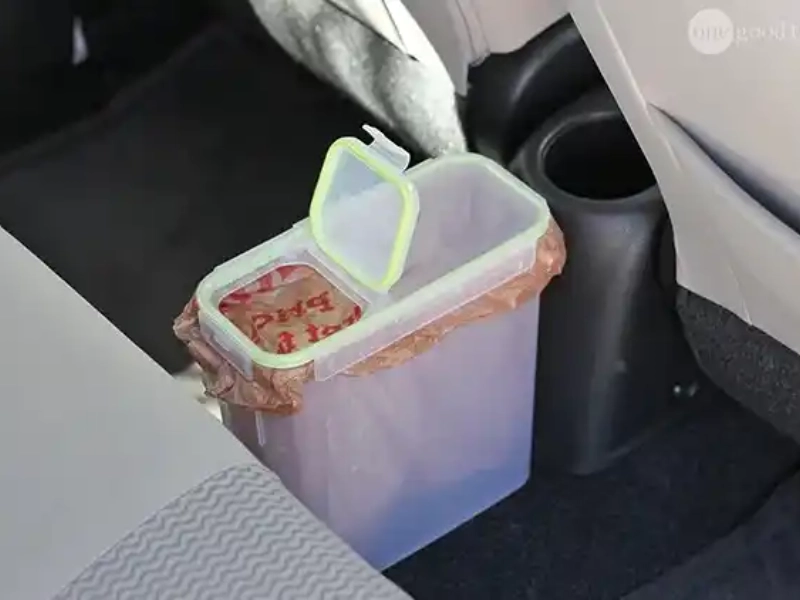
Keeping a clean, odor-free car interior can be difficult, particularly for people who spend a lot of time in their automobiles. One of the most often occurring problems is trash accumulation, which may rapidly cause bad scents and a messy look. But there’s an easy and creative way to employ a common household item: automobile trash cans made of cereal containers.
Perfect for this use are cereal bins, those plastic containers meant to preserve morning cereals freshness. Most cars fit their small form, which lets them stand straight or be tucked tightly between seats or in door pockets. The best thing is that tight-fitting lids on these containers usually help to control smells and stop leaks.
Start by choosing a cereal bin that fits nicely at your intended site to turn into a useful car garbage can. Typical areas are the floor behind the front seats, in the centre console region, or in more expansive door pockets. Choose the bin size based on your vehicle’s size and usual trash accumulation.
Line the cereal bin then with a tiny plastic bag. Small garbage bags meant for bathroom-sized dumpsters as well as grocery bags fit this use. The bag helps keep any liquids that can leak from disposed of objects and makes trash emptying simpler. Leave enough of the bag hanging over the bin’s edges so that, when it comes time to remove it, you can quickly tie it off.
The cereal bin’s lid distinguishes this method from just stuffing a bag in your car. Closed efficiently locks in smells, so stopping them from invading the inside of your car. For food waste or other possibly stenchy products especially, this is crucial. Should the bin tilt over during quick turns or abrupt stops, the lid also prevents waste from leaking out.
Using a cereal bin has one benefit in its adaptability. It’s easy to get out of the car for complete cleaning or usage elsewhere. If you have to move the bin to discard its contents or if you wish to wash it out sometimes to stop odour development, this is especially helpful.
Before fitting the bag, think about adding a few drops of essential oil or a car air freshener to the bottom of your car trash bin to increase its efficacy. This will allow your automobile to remain smelling fresh and aid to neutralise smells. Perhaps hidden under the dumpster, you could also like to keep a small quantity of replacement bags in the car so you may readily replace the bag as needed.
If you’re worried about looks, you can match your cereal bin trash can to the inside of your automobile. From a reused cereal container to a chic automobile decoration, a fast touch of spray paint or a beautiful wrap can make all difference. To replicate a purpose-built automobile garbage can, some car buffs even add custom labels or stickers.
Establishing a schedule for emptying and cleaning your automobile trash can helps. Your use may call for daily or weekly emptying of it. Frequent maintenance guarantees that your automobile stays clean and smells free and helps to stop overflow. To keep the bin hygienic, take a moment to clean it down with a disinfecting wipe when you empty it.
Not only for personal vehicles, this cereal bin hack is also for In work trucks, RVs, or boats it can also be quite handy. In certain environments where waste could gather for extended periods or where outdoor factors might otherwise interfere with loose trash bags, the sealed container is especially helpful.
Not only are you addressing a typical issue by using a cereal bin as a car trash can, but you also practise some environmentally responsible upcycling. Rather than buying a specific automobile trash can, you’re giving something that may wind up in a landfill new life. A first step towards more environmentally friendly living is this little creative reusing gesture.
Using this straightforward but powerful fix will make driving much better. A spotless, odor-free car inside helps to create a more comfortable surroundings, thereby lowering tension and improving your enjoyment of your driving. For individuals who regularly drive or commute, especially, this little adjustment can significantly affect your everyday life.
One great example of how commonplace objects may be used to address shared issues is the cereal bin automobile garbage can. It shows that often we may find straightforward, reasonably priced answers to make our daily life better with some imagination and innovation. Thus, think of giving that plastic bin second life as your car’s new garbage container the next time you finish a box of cereal.
7.Reduce Glare With A Tinted Plastic Sheet
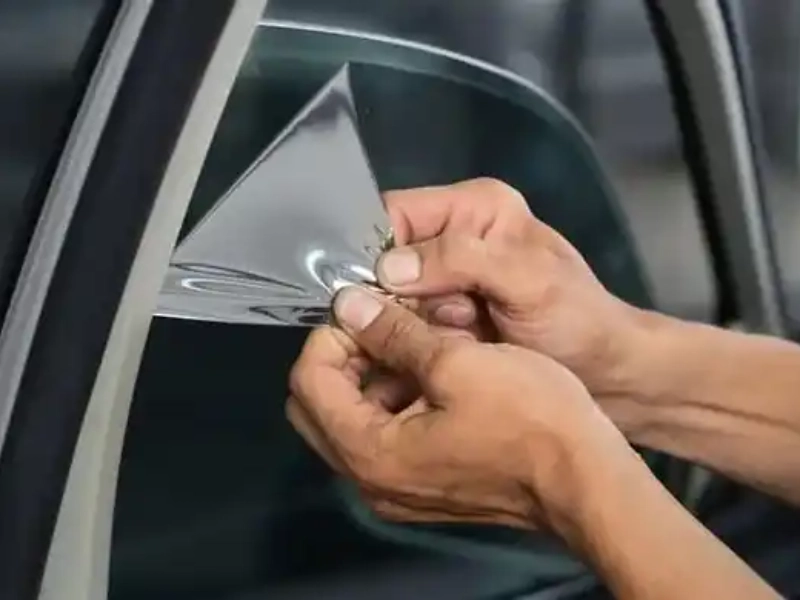
Particularly at low on the horizon during dawn or sunset, driving during some times of the day might be difficult due of sun glare. This issue not only irritates me but also could be dangerous since it reduces visibility and raises the accident risk. Though they provide some respite, sunglasses and automobile visors are not always enough or practical. Many drivers, meanwhile, ignore a straightforward and efficient fix for glare: using a tinted plastic sheet.
Applying a detachable tinted plastic sheet to your car windows creates an instant, adjustable sun shield that can greatly enhance comfort and visibility while driving. Simple, reasonably priced, and flexible nature of this solution makes it beautiful.
You will have to buy a roll of stationary cling window tint film in order to apply this glare-reducing method. Relying just on static electricity, this kind of film follows glass surfaces without any adhesive. This makes applying, removing, and re orienting as necessary simple. Choose a tint film based on a shade that will sufficiently reduce glare without undulating your view too darkly. Most times, a light to medium hue is plenty.
Applying is easy. To guarantee the film stays correctly, first provide your automobile window’s inside surface complete washing. Cut a piece of the tint film somewhat larger than the area you intend to cover. Depending on your demands and inclination, this might be the whole window or only a part. Starting from one edge and smoothing it out as you go to avoid air bubbles, gently apply the film to the glass off the protective covering.
This approach has great flexibility among other main benefits. Unlike permanent window tinting, which compromises your view everywhere, this removable film can be used just as needed. You might use it, for example, during your morning journey east and then take it off on your way back. Its position on the window can also be readily changed to block glare from many directions as the sun crosses the sky.
Apart from lessening of glare, the tinted film provides other advantages. By shielding some of the sun’s heat, it can help your car stay cooler and perhaps increase fuel economy by lowering the need for air conditioning. The movie also offers some privacy and can shield the inside of your automobile from UV damage, so preventing over-time fading and cracking.
Drivers who need prescription glasses could find this very helpful. Although transition lenses darken in reaction to sunshine, their UV-filtering qualities of windscreens cause them not always to activate entirely inside a car. For those with sensitive eyes or light-reactive lenses, the tinted film offers another layer of glare protection that can make driving more pleasant.
Although most regions allow this hack to be legal and successful, you should verify local laws about window tinting anyway. Certain jurisdictions, especially for front windows, have limits on the darkness window tinting can be. From a legal sense, nevertheless, this solution’s removable character usually makes it a non-problem since it can be taken off fast should needed.
Keep many tint film pieces in your car for best effects; cut to fit varying windows. Whether it’s the side windows during a low midday sun or the top section of your windscreen to block sunlight from above, this lets you fast apply protection anywhere it’s most needed.
Though easy, regular maintenance of your coloured film is crucial. Store the film flat in non-use to avoid damage or creasing. To guarantee proper adherence and clear vision, routinely clean the window surface as well as the film. It’s simple and cheap to replace a damaged or less effective film.
Those who regularly drive in regions with plenty of shiny surfaces like water or snow or during sunrise or sunset hours will especially find this glare-reducing trick helpful. Long car journeys benefit from it as well since sun location and intensity vary greatly during the trip.
Your driving comfort and safety will be much improved by using this basic yet efficient fix. Being able to quickly change the tint degree of your automobile on the road offers a degree of control over your driving surroundings not possible with conventional approaches. Your regular commute or long-distance excursions will benefit much from this little investment.
The tinted plastic sheet hack is an excellent example of how creative thinking could produce workable answers for daily difficulties. It reminds us that often the most simple solutions are also the best ones; they just need some imagination and openness to try something fresh. Remember thus the next time you find yourself squinting against the low sun that a basic sheet of tinted plastic could be all you need to drive comfortably and safely.
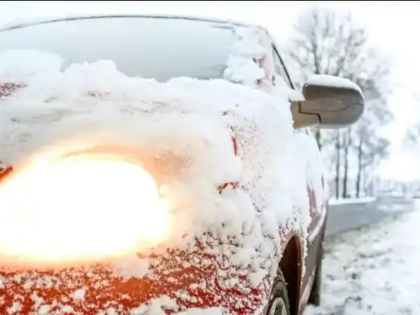
8.Lessen Frost By Parking Your Car Facing East

For drivers especially when it comes to defrosting a car covered in ice and frost, winter mornings may be quite demanding. In chilly conditions, this daily fight can be uncomfortable and taxing in addition to devoting important time. Parking your car east will help to greatly minimise the amount of frost on it, though, using a basic but efficient approach.
This innovative trick helps defrost your car using the sun’s natural movement. Your car will be orientated to catch the first rays of the morning sun if it faces east. Especially on your front windscreen, these early sunbeams—while not strong—can clearly melt ice and frost.
There is simple scientific basis for this approach. The sun shows up in the east as the Earth turns. The front windscreen of your automobile functions as a solar panel, catching the sun’s rays as soon as it shows up on the horizon when you are parking facing this direction. Weak as it is, this early morning sunlight starts to warm the glass and melt the frost before you ever leave your house.
You will have to take some considerations if you want this approach to be implemented successfully. Sort your parking choices first. See whether you could orient your car eastward from your driveway or designated parking area. For those who park on the street, attempt to select a location allowing an eastern-facing view. Parking may call for a little extra work or forethought, but the morning savings could be well worth it.
Your geographic location and the season will affect the efficiency of this approach. This method can be dependable across seasons in places nearer the equator, where the sun’s course is more stable all year long. The sun’s location varies more dramatically between summer and winter in more northern or southern latitudes, though. To get the most advantage as the seasons change, you might have to modify your parking angle somewhat.
Although this approach can greatly slow down frost accumulation, it cannot guarantee against all ice development. Development of frost is significantly influenced by elements like temperature, humidity, and cloud cover. You might still have to utilise conventional defrosting techniques on really frigid or gloomy morning. Still, an east-facing car usually needs less work to clear than one parked in other directions even in similar situations.
Beyond only reducing frost, this parking approach has other advantages. You can cut the time your engine must idle to heat the inside by allowing the sun perform some of the tasks in warming your vehicle. This makes it a green decision as well since it results in lowered emissions and fuel savings. Furthermore, in colder locations specifically, a warmer car interior in the morning might contribute to a more comfortable beginning of your day.
The advantages are far more noticeable for individuals who leave for work after sunrise. The sun will have had more time to work on melting ice and heating your car by the time you’re ready to leave. This will help to greatly reduce the time and effort required to get your car ready for the morning drive.
Think about combining this approach with other strategies for frost-prevention to maximise its potency. For even better protection against frost, for instance, pair east-facing parking with a windscreen cover or car blanket. While the eastern position lets sunlight warm the car and melt any frost that does gather on other surfaces, the cover can protect your windscreen from direct frost development.
Interestingly, this approach is not only good in winter. Parking east can help to lessen the strong afternoon heat in summer. The sun will be behind your car instead of scorching straight across your windscreen by the time it is strongest in the afternoon, thereby possibly keeping the inside cooler.
This parking technique is easily available for all drivers since it calls for no particular tools or cost. It’s a great illustration of how knowledge about and interaction with natural events may produce useful, daily answers. Just changing the position of your parked automobile will help you to use the sun’s energy to somewhat ease your winter mornings.
This east-facing parking tip reminds us of the need of seeing and adjusting to our surroundings, not only of a handy trick for simpler mornings. It motivates us to consider how we may collaborate with nature instead of against it, therefore generating simpler and usually more successful answers to daily problems.
In essence, even if parking your car east seems like a minor and unimportant adjustment, it will clearly affect your daily schedule in the winter. It’s evidence of the theory that often the easiest answers are also the ones that call for little more than some awareness and a readiness to change our behaviour. Therefore, think about orienting your car eastward the next time you park it on a chilly night; you might just find thanks the next morning.