Shoes often top the list of our high-maintenance relationships. No one wants a worn-out pair of sneakers to accompany them on a first date or fail them on a rainy day. And for more formal events, an uncomfortable pair of heels can easily ruin the night. It’s often said that a person’s shoes speak volumes about them, so let’s ensure yours are odor-free, comfortable, and in pristine condition. Keep scrolling for our tips on how to achieve just that!
1.Use Baby Powder to Stop Your Shoes From Squeaking
Have you ever tried to confidently stride into a business meeting or a social event, only to be announced ahead of time by an awkward squeaking sound coming from your shoes? Nothing is quite as embarrassing when you want to make an excellent first impression. Yet there seems to be nothing you can do about it when it happens – that’s until you stumbled across this hack! A quick cure for preventing that unwelcome noise: Baby powder.
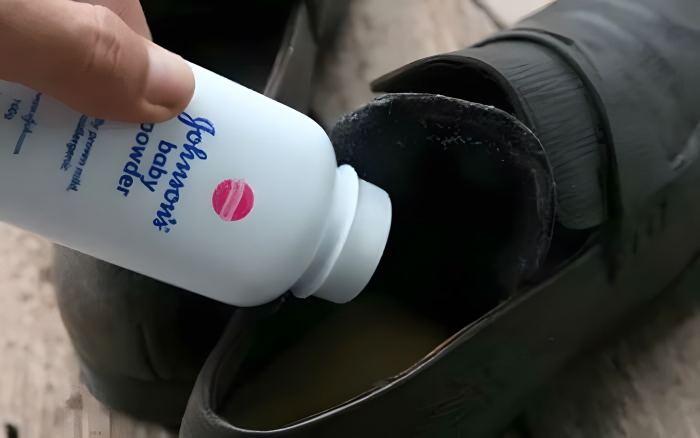
Have you ever tried to confidently stride into a business meeting or a social event, only to be announced ahead of time by an awkward squeaking sound coming from your shoes? Nothing is quite as embarrassing when you want to make an excellent first impression. The sound can be distracting and can make you feel self-conscious, as everyone turns to see where the noise is coming from. It’s a small issue, but it can have a big impact on your confidence and how you’re perceived by others. Yet, there seems to be nothing you can do about it when it happens – that’s until you stumbled across this hack! A quick cure for preventing that unwelcome noise is baby powder.
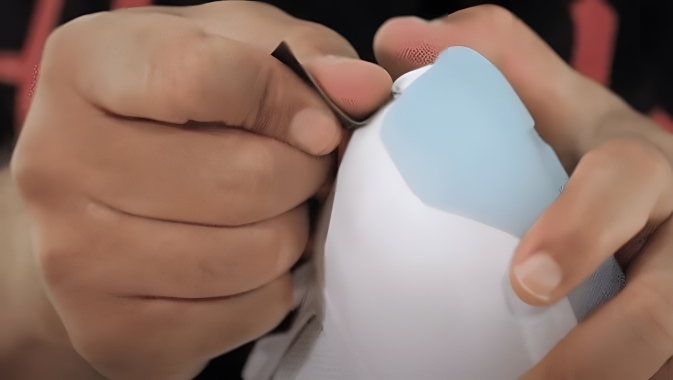
You’re probably thinking, “Baby powder inside shoes? No way.” Let’s explain. The trick is to add the powder beneath the shoe sole. This creates better cohesion between the different parts of your shoe, thus preventing the squeak. Handy, right? The powder acts as a lubricant, reducing friction between the insole and the shoe, which is often the culprit of the squeaking sound. This friction is what causes the annoying noise, and by reducing it, you can walk in peace.
To apply the baby powder, you need to remove the insole of the shoe if possible. Sprinkle a small amount of powder inside the shoe and around the edges where the insole meets the shoe. If the insole is not removable, you can sprinkle the powder around the edges of the insole as best as you can. After applying the powder, put the insole back in place, and give your shoes a little shake to distribute the powder evenly. This ensures that the powder gets into all the nooks and crannies where friction might be causing the squeak.
This simple trick can save you from a lot of embarrassment and make your shoes much more comfortable to wear. Plus, baby powder has the added benefit of keeping your shoes smelling fresh. It’s a win-win situation. So, the next time you hear that annoying squeak, reach for the baby powder, and stride into your meeting or event with confidence, knowing that your shoes won’t give you away. This little hack is not only effective but also cost-efficient, as baby powder is inexpensive and readily available. It’s a small investment for a big improvement in your daily comfort and confidence.
2.Use Heel Grips
Even the best nights out can end early when an uninvited blister makes itself known! One of the most common solutions to this problem is packing an extra pair of slip-on shoes. But let’s be honest, who wants to drag these along everywhere they go? But now, you won’t need backup shoes any longer. Instead, you can prevent blisters with a cushioned heel grip. Heel grips are available in different sizes. So, no matter what pair you wear, you can easily attach a heel grip to your shoe.
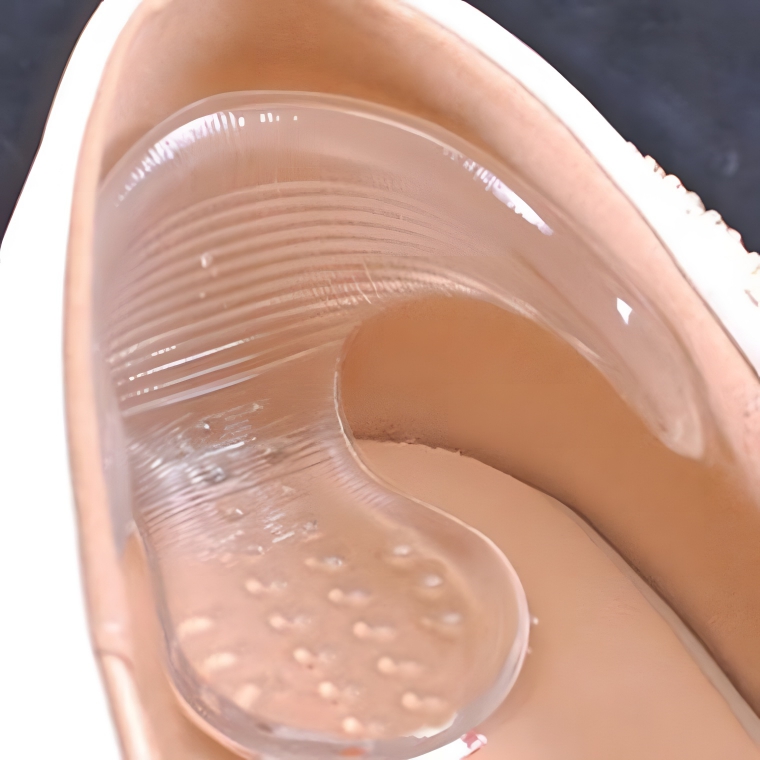
Even the best nights out can end early when an uninvited blister makes itself known! Blisters are not only painful but can also ruin your entire evening or event. One of the most common solutions to this problem is packing an extra pair of slip-on shoes. But let’s be honest, who wants to drag these along everywhere they go? Carrying an extra pair of shoes can be inconvenient and cumbersome, especially if you are trying to travel light. But now, you won’t need backup shoes any longer. Instead, you can prevent blisters with a cushioned heel grip.
Heel grips are available in different sizes, so no matter what pair you wear, you can easily attach a heel grip to your shoe. These grips are designed to stick to the inside of your shoe, providing a soft cushion that reduces friction and prevents blisters from forming. They are made from materials like gel or foam, which conform to the shape of your heel, offering a custom fit. This means you can wear your favorite shoes without worrying about painful blisters.
Similar to protecting you from blisters, a cushioned heel grip that extends from the heel to the bottom of the ankle will also help prevent nasty-looking marks or bruises from forming – win-win! These marks can be unsightly and uncomfortable, and they often take a long time to heal. By using heel grips, you can avoid these issues altogether. They also provide extra support and comfort, making it easier to walk or stand for long periods.
To use heel grips, simply peel off the backing and stick them to the inside of your shoe, where the heel rests. Make sure they are positioned correctly and press firmly to ensure they stay in place. Once applied, you’ll notice a significant difference in comfort and support. Heel grips are discreet and won’t alter the appearance of your shoes, so you can continue to look stylish while staying comfortable. They are also reusable and can be transferred from one pair of shoes to another, making them a versatile addition to your footwear collection.
In conclusion, heel grips are a simple and effective solution to prevent blisters and discomfort. They allow you to enjoy your night out without the worry of painful blisters or marks. So, next time you’re getting ready for a big event, don’t forget to add heel grips to your shoes. They’ll keep your feet happy and comfortable, ensuring you can dance the night away or walk confidently without any pain. It’s a small investment for a big improvement in your overall comfort and enjoyment.
3.Get Rid of Wrinkles in Your Sneakers With Steam
You don’t need us to tell you that new shoes look distinctly different from those you bought just a few months ago. With time, your sneakers will wrinkle and eventually look worn down. You might be able to ward off dirt with a moist cloth, but getting rid of the wrinkles may seem impossible. So here’s the trick: Steam and shoes go together like peanut butter and jelly. You just need a clothes iron and a damp cloth.
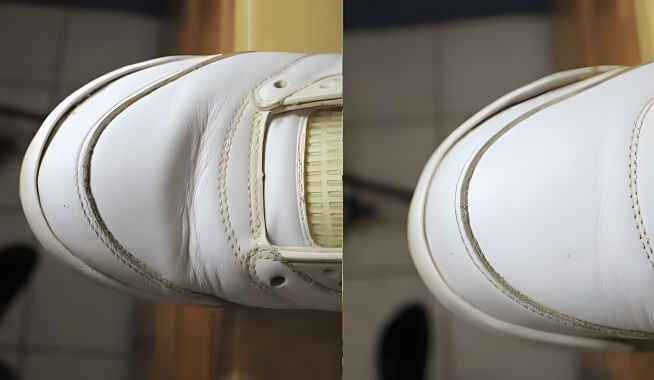
You don’t need us to tell you that new shoes look distinctly different from those you bought just a few months ago. With time, your sneakers will wrinkle and eventually look worn down. This is a natural part of the wear and tear process, but it can be frustrating if you want to keep your shoes looking fresh. You might be able to ward off dirt with a moist cloth, but getting rid of the wrinkles may seem impossible. Those creases can make even the cleanest shoes look old and tired. So here’s the trick: Steam and shoes go together like peanut butter and jelly. You just need a clothes iron and a damp cloth.
Put the cloth on the wrinkles, and rub it gently with the iron. The steam from the damp cloth will help relax the material of the shoe, making it easier to smooth out the wrinkles. Try to get in those crevasses to beat that dirt and grime for a longer shine. The heat and moisture work together to soften the fabric, allowing you to reshape it and remove the creases. You might not be able to get rid of every imperfection, but that wear and tear will be much less visible!
This method works particularly well on leather and synthetic materials, but it can also be used on fabric sneakers with a bit of caution. Be careful not to apply too much heat, as this can damage the material. Always start with a lower temperature setting and gradually increase if needed. The key is to be gentle and patient, allowing the steam to do most of the work. You’ll be amazed at how much of a difference this simple trick can make.
In addition to removing wrinkles, steaming your sneakers can also help sanitize them. The heat from the steam can kill bacteria and germs, leaving your shoes not only looking better but also smelling fresher. This is especially useful for athletic shoes that tend to get sweaty and smelly over time. Regular steaming can help keep them in better condition and extend their lifespan.
So, the next time you notice your sneakers looking a bit worse for wear, give this steaming method a try. It’s an easy and cost-effective way to rejuvenate your shoes and keep them looking their best. Plus, it’s a great way to maintain your footwear without having to buy new pairs frequently. With a little effort and the right technique, you can keep your sneakers looking almost as good as new.
4.Criss-Crossed Laces
Getting creative with your sneakers is a fantastic hobby for any shoe lover. There are thousands of tutorials all over the web! But first things first, wash your laces. They see rain, dust, dirt, and more! So treat them to a soapy bath, dry them, and then get to work on your new lacing design. Criss-cross laces are just one of many options. If the chequered pattern isn’t for you, you can create diamond lacing, star laces, ladders, loops, layovers, and more.

Getting creative with your sneakers is a fantastic hobby for any shoe lover. There are thousands of tutorials all over the web! But first things first, wash your laces. They see rain, dust, dirt, and more! So treat them to a soapy bath, dry them, and then get to work on your new lacing design. Criss-cross laces are just one of many options. If the chequered pattern isn’t for you, you can create diamond lacing, star laces, ladders, loops, layovers, and more. Each of these designs can give your sneakers a completely new look and feel, allowing you to express your personal style in a unique and creative way.
Don’t forget you’re not tied to the laces that come with your shoes either (pardon the pun!). Switching them out for a new color can inject extra personality into an otherwise plain pair. You could even coordinate your laces with your outfit! Imagine wearing a pair of red laces with a red dress, or blue laces with your favorite blue jeans. The possibilities are endless, and it’s a simple way to make a big impact on your overall look.
If you’re feeling particularly adventurous, you can even mix and match different colors and styles of laces. For example, you could use one color for the criss-cross pattern and another for the loops, creating a multi-dimensional effect. This can be especially fun if you have a collection of laces in various colors and materials, as you can experiment with different combinations to see what works best for you.
Moreover, changing your laces can also be a practical decision. For instance, if you’re planning to go hiking or engage in other outdoor activities, you might want to switch to more durable, thicker laces that can withstand the rigors of the trail. On the other hand, if you’re attending a formal event, you might opt for sleek, thin laces that add a touch of elegance to your outfit.
In conclusion, getting creative with your sneaker laces is a fun and easy way to refresh your footwear and express your individuality. Whether you prefer criss-cross laces, diamond lacing, star laces, or any other design, there are countless options to explore. So go ahead, give your laces a good wash, and start experimenting with new patterns and colors. You’ll be amazed at how such a small change can make a big difference in your overall style.
5.Start Using Heel Tips
The tip of your shoe’s heel meets the ground thousands of times every day. However, if you regularly wear a thinner pair of heels like a stiletto, a court shoe, or a kitten heel, you might be putting too much strain on your shoe’s heels. A broken heel is such a common ordeal that it often features as a clumsy mishap in romantic comedies. While we can’t promise you that you’ll never find yourself in a heel-related emergency, we can help you reduce the chances of it happening.
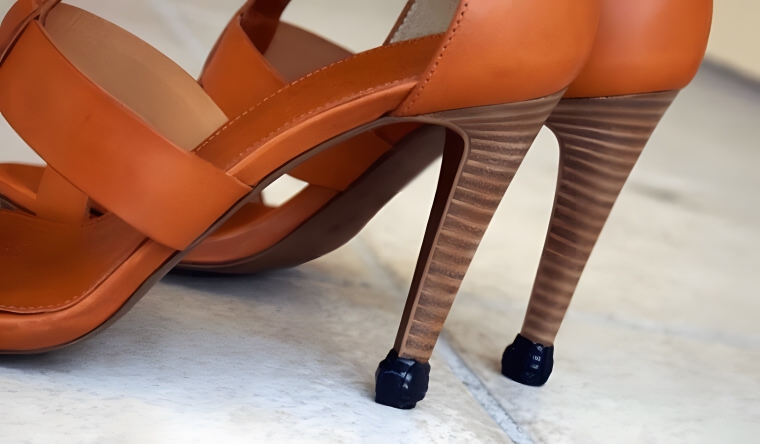
The tip of your shoe’s heel meets the ground thousands of times every day. However, if you regularly wear a thinner pair of heels like a stiletto, a court shoe, or a kitten heel, you might be putting too much strain on your shoe’s heels. A broken heel is such a common ordeal that it often features as a clumsy mishap in romantic comedies. While we can’t promise you that you’ll never find yourself in a heel-related emergency, we can help you reduce the chances of it happening.
This is where heel tips come in! Aptly named, you add heel tips to the tips of your heels to benefit from a non-slip grip and better protection for the most fragile part of your heel. Heel tips are small, often rubber or metal, pieces that you attach to the bottom of your heel. They provide an extra layer of protection and help distribute the pressure more evenly, reducing the risk of breakage.
In addition to preventing heel breakage, heel tips can also improve your overall comfort. Walking on thin heels for extended periods can be uncomfortable and even painful. Heel tips provide a bit of cushioning and support, making it easier to walk and stand for longer periods. They can also help reduce the noise that heels make when they hit hard surfaces, which can be a bonus if you’re trying to avoid drawing attention to your footsteps.
Another advantage of using heel tips is that they can extend the life of your shoes. By protecting the most vulnerable part of your heel, you can prevent damage that might otherwise lead to the need for costly repairs or even replacement. This can be especially beneficial if you have a favorite pair of heels that you want to keep in good condition for as long as possible.
Applying heel tips is a relatively simple process. Most heel tips come with instructions and can be attached using basic tools. If you’re not comfortable doing it yourself, you can also take your shoes to a professional cobbler who can install the heel tips for you. Once they’re in place, you’ll notice a significant difference in the stability and durability of your heels.
In conclusion, start using heel tips to protect your heels, improve your comfort, and extend the life of your shoes. Whether you wear stilettos, court shoes, or kitten heels, heel tips can make a big difference in your overall shoe-wearing experience. So don’t wait until you find yourself in a heel-related emergency – take proactive steps to protect your heels and enjoy the benefits of added stability and comfort.
6.Rub Sandpaper on the Soles of Your Shoes for Better Grip
New shoes often lack traction, which is no joke during the icy and slippery winter months. Wet stairs, dead leaves, and thin ice can make for treacherous ground. As we all know, even falling from a standing height can prove painful. Fortunately, you can speed up the natural traction that comes with time by rubbing sandpaper over the soles of your shoes. Or, you can take this a step further by fixing sandpaper onto the outer layer of your shoes.
New shoes often lack traction, which is no joke during the icy and slippery winter months. Wet stairs, dead leaves, and thin ice can make for treacherous ground. As we all know, even falling from a standing height can prove painful. Fortunately, you can speed up the natural traction that comes with time by rubbing sandpaper over the soles of your shoes. Or, you can take this a step further by fixing sandpaper onto the outer layer of your shoes.
That way, if you slip while walking, there’s more friction between you and the floor, making it easier to balance yourself and stop a fall. This is a game-changer – especially if you’re wearing heels and have further to fall! Using sandpaper to create better grip on your shoes is a simple yet effective method to ensure your safety during the colder months. It’s an inexpensive solution that can make a significant difference in your everyday life.
To begin, choose a medium-grit sandpaper, which is abrasive enough to create texture but not so rough that it damages your shoes. Rub the sandpaper gently over the soles of your shoes, focusing on areas that make the most contact with the ground. You’ll notice that the soles become rougher, providing better traction. This process can be repeated as needed to maintain the grip, especially if you wear the shoes frequently.
For an even more secure solution, you can cut pieces of sandpaper and adhere them to the soles of your shoes using a strong adhesive. This method ensures that the sandpaper stays in place and provides consistent grip. Be sure to trim the sandpaper to fit the shape of your soles, and press firmly to ensure a strong bond. This technique is particularly useful for shoes with smooth soles that are prone to slipping.
In addition to improving grip, using sandpaper on your shoe soles can also help break them in more quickly. New shoes can often feel stiff and uncomfortable, but the added texture from the sandpaper can make them more flexible and easier to wear. This can be especially beneficial for leather shoes, which tend to be rigid when new.
Overall, rubbing sandpaper on the soles of your shoes is a practical and effective way to enhance traction and ensure your safety during slippery conditions. Whether you’re navigating icy sidewalks, wet stairs, or leaf-covered paths, this simple hack can help prevent falls and keep you steady on your feet. So next time you find yourself slipping and sliding in your new shoes, reach for some sandpaper and give this method a try. You’ll be amazed at how much of a difference it can make.
7.DIY Shoe Soles for Added Comfort
Finding comfortable shoes can take time and effort. If you often struggle to find the right pair, you might become immensely attached to the one you have that feels good. Then, if that pair breaks, you’re back to square one. Or maybe not! Shoe comfort relies heavily on the shoe’s soles. So, if you want to keep your feet happy, why don’t you consider designing your own sole? All you need is a grippy fabric cut to the size of your shoe and a hot glue gun.
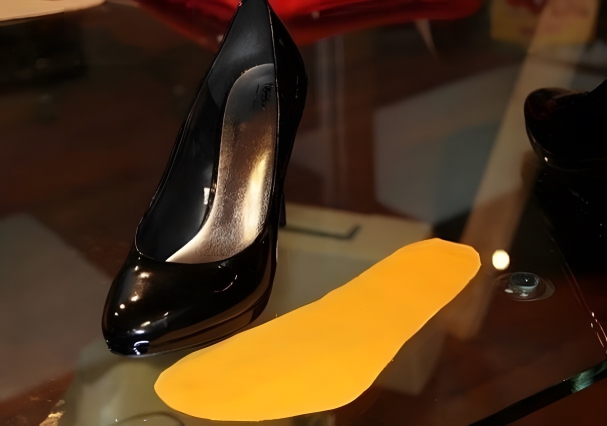
Finding comfortable shoes can take time and effort. If you often struggle to find the right pair, you might become immensely attached to the one you have that feels good. Then, if that pair breaks, you’re back to square one. Or maybe not! Shoe comfort relies heavily on the shoe’s soles. So, if you want to keep your feet happy, why don’t you consider designing your own sole? All you need is a grippy fabric cut to the size of your shoe and a hot glue gun.
The process of creating your own shoe soles is straightforward and can be quite satisfying. Start by selecting a fabric that has a good grip and some cushioning. This could be an old yoga mat, a piece of felt, or any other material that you find comfortable. Cut the fabric to match the size and shape of your shoe’s insole. You may want to use the existing insole as a template to ensure a perfect fit.
Next, use a hot glue gun to attach multiple layers of the fabric together. The number of layers will depend on how thick and cushioned you want the sole to be. Make sure to apply the glue evenly and press the layers firmly together to avoid any gaps. Once the glue has dried, you can trim any excess fabric to ensure a smooth edge.
After your custom sole is complete, insert it into your shoe and test it out. You may need to make some adjustments to the thickness or shape to achieve the perfect fit. The beauty of this DIY project is that you have complete control over the materials used, the thickness, and the shape of the sole. This allows you to create a custom solution that perfectly suits your needs and preferences.
This hack is not only cheaper than expensive inserts but also provides a personalized level of comfort that store-bought options may not offer. Additionally, because you can experiment with different materials and designs, you can continually improve your custom soles until you find the perfect combination. This can be particularly beneficial for individuals with specific foot issues or those who spend a lot of time on their feet.
In conclusion, designing your own shoe soles is a practical and cost-effective way to enhance the comfort of your footwear. With just a few simple materials and a bit of creativity, you can create custom soles that keep your feet happy and comfortable. So, the next time you find yourself struggling to find comfortable shoes, give this DIY project a try. You might be surprised at how much of a difference it can make.
8.Use Deodorant to Prevent Blisters
We can agree that nothing is as uniquely painful and inconvenient as blisters? This is especially true when dancing during a night out or going for a walk with your friends So any hack that can reduce the chance of blisters is worth a try. Perhaps surprisingly, that hack is deodorant. That’s right – all you need to do is apply a bit of clear gel deodorant to the affected area when you feel the friction that indicates a blister is coming on.
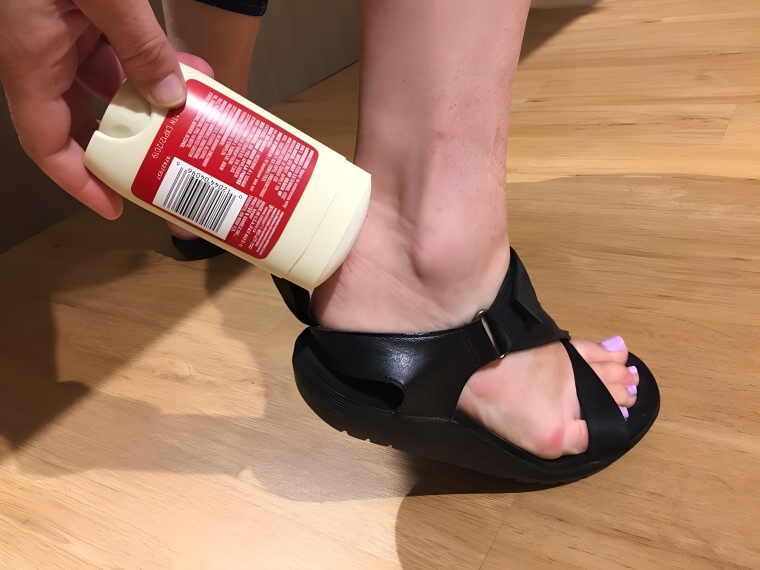
We can agree that nothing is as uniquely painful and inconvenient as blisters. This is especially true when dancing during a night out or going for a walk with your friends. So any hack that can reduce the chance of blisters is worth a try. Perhaps surprisingly, that hack is deodorant. That’s right – all you need to do is apply a bit of clear gel deodorant to the affected area when you feel the friction that indicates a blister is coming on.
The idea behind this hack is that the deodorant creates a protective barrier between your skin and the shoe, reducing friction and preventing blisters from forming. Clear gel deodorants are particularly effective because they are thick enough to provide a cushioning layer but also smooth enough to reduce rubbing. Simply apply a generous amount of deodorant to the areas of your feet that are prone to blisters, such as the heels, toes, and sides of your feet.
It’s important to use a stick-type deodorant that is thick enough to stay in place and provide adequate protection. Roll-on or spray deodorants may not be as effective because they can wear off more quickly. Additionally, make sure to choose a deodorant that is suitable for your skin type. If you have sensitive skin, you may want to test the deodorant on a small area first to ensure it doesn’t cause irritation.
This hack is particularly useful for new shoes that haven’t been broken in yet. New shoes can often be stiff and cause friction, leading to blisters. By applying deodorant before wearing them, you can reduce the risk of blisters and make the break-in process more comfortable. It’s also a great solution for long walks, hikes, or any activity that involves a lot of foot movement.
In conclusion, using deodorant to prevent blisters is a simple and effective hack that can save you a lot of pain and discomfort. By creating a protective barrier between your skin and your shoes, you can reduce friction and prevent blisters from forming. So, the next time you feel the telltale signs of a blister, reach for your clear gel deodorant and give this hack a try. Your feet will thank you.
9.Use Newspaper to Widen the Tops of Your Boots
While you want your boots to fit snuggly to ensure your comfort, you might occasionally find a pair sitting a little too tightly around your calf. Ouch! Unfortunately, this is a frequent problem with high-rise boots, especially if your leg has rounded out a little more. Thankfully, the answer isn’t to throw away your beloved shoes. Instead, you can widen the boot shaft to better fit your leg. Here’s how:
While you want your boots to fit snugly to ensure your comfort, you might occasionally find a pair sitting a little too tightly around your calf. Ouch! Unfortunately, this is a frequent problem with high-rise boots, especially if your leg has rounded out a little more. Thankfully, the answer isn’t to throw away your beloved shoes. Instead, you can widen the boot shaft to better fit your leg. Here’s how:
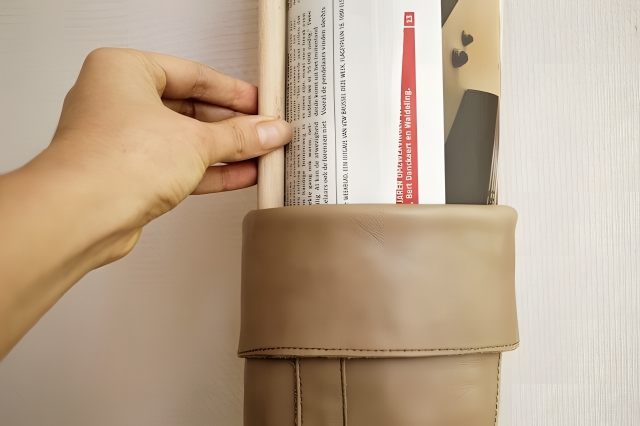
When you’re not wearing the boot (perhaps while you’re sleeping?), stuff the shoe tightly with old newspapers and leave it for as long as possible. This helps widen the trunk of your boots. The newspaper works by gently stretching the material, allowing it to conform to the shape of your calf over time. This method is particularly effective for leather boots, which can be quite stiff and difficult to stretch.
To start, gather a stack of old newspapers and tear them into strips. Crumple the strips into small balls and stuff them tightly into the shaft of your boots. Make sure to pack the newspaper as tightly as possible to create maximum pressure. You can also use a shoe stretcher in combination with the newspaper for even better results. Leave the newspaper in the boots overnight or for several days, depending on how much stretching is needed.
After removing the newspaper, try on your boots to see if they fit more comfortably. You may need to repeat the process a few times to achieve the desired fit. If the boots are still too tight, you can try using a leather stretching spray in combination with the newspaper. The spray helps to soften the leather, making it more pliable and easier to stretch.
In addition to using newspaper, there are other methods you can try to widen the tops of your boots. For example, you can use a blow dryer to heat the material while wearing thick socks. The heat helps to soften the material, allowing it to stretch more easily. You can also take your boots to a professional cobbler who can use specialized tools to stretch the boots for you.
In conclusion, using newspaper to widen the tops of your boots is a simple and effective solution to ensure a more comfortable fit. By gently stretching the material, you can create more room for your calves and enjoy your boots without discomfort. So, the next time you find your boots fitting a little too snugly, give this method a try. With a bit of patience and effort, you can achieve a perfect fit and continue to enjoy your favorite boots.
10.Use Tea Bags to Remove Unpleasant Odors
When the days are warm, and you’re maintaining a sporty lifestyle, there’s no avoiding your feet getting sweaty. While you can easily wash your feet at the end of the day, and they’ll lose their unpleasant smell, the same can’t be said for your shoes. Unfortunately, shoe soles have a habit of maintaining that unwanted stench indefinitely. Not all shoes can be thrown into the washing machine. If this is your predicament, you’ll need to get creative!
When the days are warm, and you’re maintaining a sporty lifestyle, there’s no avoiding your feet getting sweaty. While you can easily wash your feet at the end of the day, and they’ll lose their unpleasant smell, the same can’t be said for your shoes. Unfortunately, shoe soles have a habit of maintaining that unwanted stench indefinitely. Not all shoes can be thrown into the washing machine. If this is your predicament, you’ll need to get creative!
The solution? Put unused tea bags into your shoes. These are fantastic at absorbing strong scents as they suck the moisture right out! Tea bags are made from porous materials that can effectively absorb moisture and odors. The tannins in tea also have natural deodorizing properties, which can help neutralize unpleasant smells. To use this method, simply place a couple of unused tea bags into each shoe and leave them overnight. By morning, the tea bags will have absorbed the moisture and odors, leaving your shoes smelling fresh.
It’s important to note that you should use unused tea bags for this purpose. Used tea bags may still contain moisture and could potentially make the odor problem worse. Additionally, make sure to use tea bags that do not contain any added flavors or oils, as these could leave a residue in your shoes.
This method is particularly useful for athletic shoes, which are often made from materials that can trap moisture and odors. However, it can also be used for other types of footwear, including dress shoes and boots. If you find that your shoes still have a lingering odor after using tea bags, you can repeat the process or try using more tea bags for a stronger effect.
In addition to using tea bags, there are other steps you can take to prevent and manage shoe odors. For example, make sure to let your shoes air out after wearing them, and consider using foot powder or antiperspirant to reduce sweating. Regularly cleaning your shoes and insoles can also help keep them fresh.
Overall, using tea bags to remove unpleasant odors from your shoes is a simple, cost-effective, and natural solution. It’s a great way to keep your footwear smelling fresh without the need for harsh chemicals or expensive products. So the next time you notice an unpleasant smell coming from your shoes, give this method a try. Just remember not to put the tea bags back into the box afterward!